No matter whether it’s for selling, donating, or troubleshooting purposes – wiping a Lenovo laptop may often be essential. A factory reset will erase all personal data while returning it to its default settings – in this comprehensive guide, we cover how you can wipe a Lenovo laptop using factory reset methods as well as more advanced techniques designed to permanently delete it all from its memory.
Why would You Wipe Out Your Lenovo Laptop?
There may be various reasons that necessitate wiping your Lenovo laptop:
- Selling or Donating: For personal data removal before passing your laptop on to another user. Troubleshooting Issues: A factory reset could help solve software or performance problems on Lenovo laptops that have been developed.
- Removal of Malware/Viruses: For complete and thorough malware or virus elimination, nothing beats using an extensive wipe to completely wipe everything away. Other methods cannot do the same job.
- Prepare Your System: Wiping Out to Install Fresh OS [Step by Step Guide for Lenovo Laptop Wipeout]. Now let’s delve into this step-by-step procedure of wiping your Lenovo laptop clean of its operating system and installing a fresh copy from scratch.
Method 1: Factory Reset with Windows Settings
If you own a Lenovo laptop running Windows 10 or 11 OS, performing a factory reset directly through its operating system can be the simplest solution for wiping it clean without going through complex procedures.
Step 1: Backup Your Files
- Before beginning to restore a factory reset process, all important documents and files must be secured on an external hard drive, USB stick, or cloud storage service like Google Drive, Dropbox or OneDrive. To protect yourself and ensure all important documents remain safe during a factory reset, take extra measures such as creating backup copies via an external hard drive, USB stick or cloud services such as Google Drive, Dropbox or OneDrive are ideal solutions.
Step 2: To Access Windows Settings
- Clicking the Start Menu, and choosing the Gear-shaped Settings Icon from it.
- From within the Settings window, navigate to Update & Security.
Step 3: of Recovery Planning Process is Navigating to the Recovery
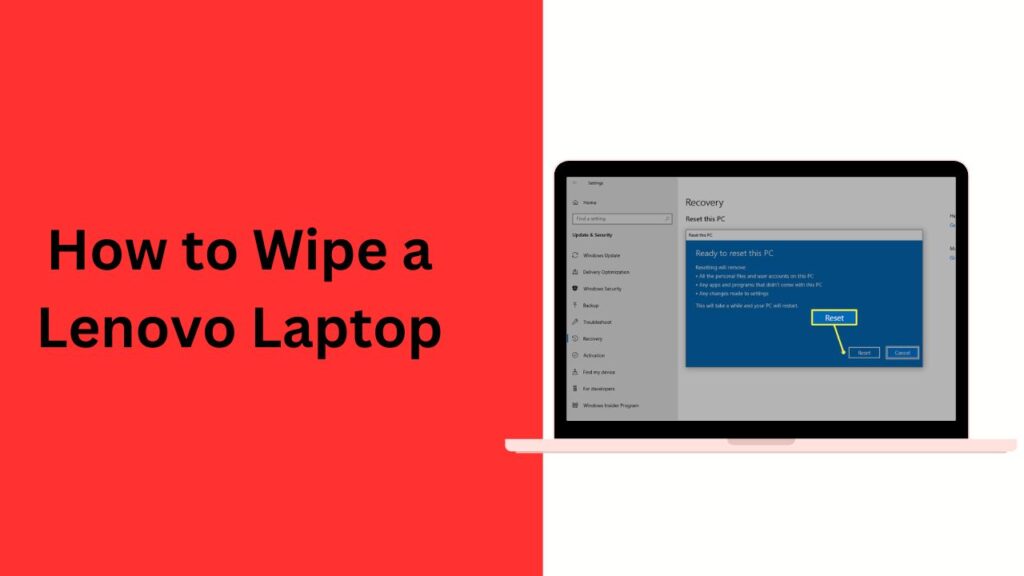
- Within the Update & Security section, select Recovery from the left-hand menu.
- Under Reset This PC, select Start Here and press Get Going.
Step 4: Choose an Option to Reset
- Once you click “Get started”, you will be presented with two options to select:
- Keep My Files: With this option, Windows will reinstall but will preserve personal files such as documents and photos while disabling apps and settings.
- Remove All Content: With this option, all personal files, apps and settings on the laptop will be deleted completely – ideal if preparing it for sale or donation.
Step 5: Select the Reinstallation Method
- Your initial question will be: Cloud download: Accesses Windows directly from Microsoft over the internet and installs it, while local reinstall uses files already stored on your PC to reinstall it.
Step 6: Complete Reset
- Once you’ve selected your preferred reset method, click Next and confirm with Reset to initiate the factory reset process on your Lenovo laptop, which may take time depending upon system specifications. Your laptop will restart to begin its factory reset journey.
Method 2: Wipe Lenovo Laptop With Novo Button
Lenovo laptops include an innovative recovery button known as the Novo button that allows users to reset their machines back to factory settings without booting into Windows, making this feature useful if you cannot access your operating system.
Step 1: Switch Off The Laptop Computer.
- Assuring your Lenovo laptop has been entirely shut off is of utmost importance.
Step 2: Navigating the Novo Button Menu
- Locate and activate the Novo button on your laptop computer; typically a small pinhole near or on the side of it containing a Novo button. Pressing this Novo button requires using either a paperclip or a pin.
Step 3: Choose System Recovery Mode
- Once you press the Novo button, the Novo Button Menu will appear. Use your arrow keys to select System Recovery before pressing Enter to complete.
Step 4: Follow On-Screen Instructions
- Follow the on-screen instructions to perform a factory reset of your laptop computer.
- This process will completely reset and reinstall Windows on a Lenovo laptop computer.
Method 3: Clear Your Lenovo Laptop BIOS (Advanced Users).
Advanced users seeking a secure and thorough wipe of their Lenovo laptop may consider wiping from BIOS; this method requires booting from a USB drive and using external tools to erase its hard drive.
Step 1: Create a Bootable USB Flash Drive
- Start by creating a bootable USB drive using data-erasing tools such as DBAN (Darik’s Boot and Nuke) or Parted Magic and following their respective websites’ instructions to download and create it.
Step 2: Accessing BIOS
- Switch off and turn back on your Lenovo laptop before pressing either F2 or Del on startup to access its BIOS menu (depending on its model). From here, navigate to the Boot menu and set your USB drive as boot priority for optimal use.
Step 3: Boot from USB and Erase the Hard Drive
- Restart the laptop to ensure it boots from USB.
- Follow any instructions provided by DBAN or Parted Magic wiping software to securely delete hard drive data.
Step 4: Reinstall Windows
- Once your hard drive has been formatted, use an installation USB or DVD to reinstall Windows onto it.
Method 4: Erase Lenovo Laptop Data with OneKey Recovery
If your Lenovo laptop features OneKey Recovery installed, this utility allows for system restoration to the original settings.
Step 1: Launch Lenovo OneKey Recovery Mode on the PC
- Launch your laptop computer and download and launch Lenovo OneKey Recovery software.
- Select System Recovery and confirm your selection.
Step 2: Select Restore From Initial Backup:
- If You do not already have an Initial Backup you will be asked for one now, so click Continue below and continue with Step two
- OneKey Recovery gives you the power to restore the system to its initial factory state, by selecting Restore From Initial Backup and clicking Next.
Step 3: Confirm and Launch the Process
- Follow the prompts and confirm that you want to restore your laptop back to factory settings, then confirm the process will start wiping and resetting everything on it. The system will begin wiping out data as part of this operation.
Conclusion
Wiping a Lenovo laptop can be an effective way of returning it back to its original condition for selling, troubleshooting or virus removal purposes. There are various methods available, from Windows settings and Novo button use through BIOS data-erasure tools and even using back up files before beginning this process; be sure to back them all up before initiating and carefully follow all steps for successful wiping!
Will Performing a Factory Reset/Wipe Remove Windows?
No. A factory reset will merely reinstall an entirely fresh copy of Windows after clearing away all personal information stored on the system.
Can I undo a factory reset?
No. A factory reset is irreversible so any valuable files must be backed up before beginning this process.
What will happen to my software licenses after wiping my laptop?
Any installed software will be uninstalled; therefore, after wiping you must reinstall and activate any licenses again.